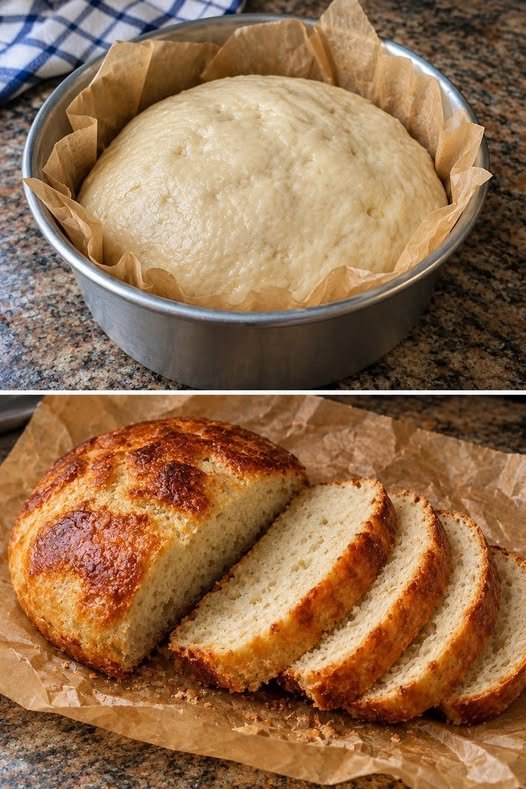
| Metric | Details |
| Active Prep Time | 10 minutes |
| Inactive Rising Time | 2 hours (first rise) + 30 minutes (second rise) |
| Baking Time | 35–40 minutes |
| Total Time | ~2 hours 45 minutes |
| Effort / Intensity Level | Low (Beginner-Friendly) — No stand mixer, kneading, or shaping skills needed |
| Thermal Intensity | High Heat — Baked at 425°F (220°C) for rapid oven spring and crust caramelization |
| Yield | 1 large round boule (approximately 12 generous slices) |
The Science Behind the Simplicity
Understanding why this dough behaves the way it does will make you a more confident baker. Most traditional bread recipes require ten minutes of vigorous kneading to align glutenin and gliadin proteins into a strong, elastic network capable of trapping fermentation gases.
In this peasant bread formula, we bypass manual labor by increasing the water-to-flour ratio (around 78% hydration). In a wetter dough, flour proteins hydrate completely and move freely, naturally linking together over a two-hour rest period. Simultaneously, enzymes in the flour break down complex starches into simple sugars. These sugars not only feed the yeast to create rich, complex flavor compounds, but they also caramelize rapidly in a hot oven, creating that signature deep golden-brown crust.
Essential Equipment
You do not need a professional deck oven or expensive Dutch oven to achieve bakery-level results, though having the right heat-safe vessel makes a noticeable difference:
-
Large Mixing Bowl: Glass, ceramic, or stainless steel (at least 4-quart capacity) to give the dough plenty of room to double.
-
Wooden Spoon or Dough Whisk: For stirring the sticky, wet dough together without overworking it.
-
Kitchen Scale (Recommended) or Measuring Cups: Weighing flour ensures consistent hydration every time you bake.
-
Baking Vessel: Either two greased 1.5-quart oven-safe Pyrex bowls, a standard 9-inch cake pan, or a cast-iron Dutch oven with a lid.
-
Instant-Read Thermometer: The foolproof way to guarantee the interior is fully baked without slicing into a hot loaf prematurely.
Ingredients
Gather these four foundational ingredients before starting. Because the ingredient list is so short, using fresh yeast and high-quality flour yields the best flavor.
-
4 cups (500 grams) All-Purpose Flour or Bread Flour: Unbleached all-purpose flour produces a tender, delicate crumb, while bread flour yields a slightly chewier texture and higher rise. Have an extra 2 tablespoons on hand for dusting.
-
2 teaspoons (12 grams) Kosher Salt: Essential for flavor balance and strengthening the gluten network. If using fine table salt, reduce to 1 ½ teaspoons.
-
2 teaspoons (6 grams) Instant Yeast (or Active Dry Yeast): Instant yeast can be whisked straight into the dry ingredients. If using active dry yeast, dissolve it in the warm water first and let it sit for 5 minutes until foamy.
-
1 ¾ cups (420 milliliters) Lukewarm Water: Aim for roughly 100°F–110°F (38°C–43°C)—warm to the touch like bathwater, never hot, as water above 130°F will kill the yeast.
-
Optional Finishing Touches: 1 tablespoon softened unsalted butter (for greasing the pan and brushing the hot crust) and flaky sea salt for garnish.
Step-by-Step Instructions
1. Mix the Dough (Intensity: Gentle Stirring, 3 Minutes)
In your large mixing bowl, whisk together the flour, kosher salt, and instant yeast until evenly distributed. Pour in the lukewarm water. Using a sturdy wooden spoon or silicone spatula, stir until all dry pockets of flour disappear and a shaggy, sticky, cohesive mass forms. Do not knead the dough; it should look wet and slightly lumpy rather than smooth.
2. Primary Bulk Fermentation (Intensity: Passive, 2 Hours)
Cover the bowl tightly with plastic wrap, a beeswax wrap, or a damp kitchen towel to prevent a dry skin from forming on the surface. Place the bowl in a draft-free, warm spot in your kitchen (around 72°F–75°F) for 2 hours. During this window, the dough will double in volume, become noticeably puffy, and develop tiny bubbles across the surface.
3. Prep the Pan and Deflate (Intensity: Light Touch, 2 Minutes)
Generously grease the inside of your oven-safe baking bowl, Dutch oven, or 9-inch round pan with softened butter. Using two forks or wet fingers, gently pull the fermented dough away from the sides of the mixing bowl toward the center—this releases excess gas and shapes the sticky dough into a loose ball. Transfer it directly into your prepared baking vessel, turning it once so the top is lightly coated in butter.
4. Second Rise & Oven Preheat (Intensity: Passive / High Heat Prep, 30 Minutes)
Place your oven rack in the lower-middle position and preheat your oven to 425°F (220°C). While the oven heats up, let the dough rest uncovered on the counter for 25 to 30 minutes until it rises just to the rim of the pan and looks airy. Lightly dust the top with a pinch of flour and score a shallow “X” across the crown with a sharp serrated knife or kitchen shears to control expansion.
5. Bake to Golden Perfection (Intensity: High Thermal Heat, 35–40 Minutes)
Slide the vessel into the preheated oven. Bake at 425°F for 20 minutes to establish a strong initial oven spring, then reduce the oven temperature to 375°F (190°C) and bake for an additional 15 to 20 minutes. The loaf is done when the crust is a deep, mahogany brown, it sounds hollow when tapped on the bottom, and an instant-read thermometer inserted into the center registers 205°F–210°F (96°C–99°C).
6. Cool Completely Before Slicing (Intensity: Patience Required, 45 Minutes)
Remove the pan from the oven and immediately turn the hot loaf out onto a wire cooling rack so steam doesn’t soften the bottom crust. For a softer, richer crust, rub a pat of cold butter over the warm top. Allow the bread to cool for at least 45 minutes before slicing; cutting too early releases trapped steam and makes the interior gummy.
Flavor Variations & Serving Suggestions
Once you master the base dough, you can customize it by folding mix-ins into the dry flour before adding water:
-
Rosemary & Roasted Garlic: Add 2 tablespoons finely chopped fresh rosemary and 6 cloves of sweet roasted garlic.
-
Sharp Cheddar & Cracked Pepper: Fold in 1 cup cubed sharp white cheddar and 1 teaspoon coarsely ground black pepper.
-
Seeded Harvest Loaf: Mix in ¼ cup toasted sunflower seeds, 2 tablespoons flaxseeds, and 1 tablespoon sesame seeds.
Serve thick, warm slices alongside hearty beef stews, roasted tomato soup, whipped salted butter, or mashed avocado with chili flakes.
Storage & Freezing Guide
Because peasant bread contains no commercial preservatives, it tastes best within the first 48 hours. Store leftovers cut-side down on a wooden cutting board covered with a clean kitchen towel for up to 2 days to preserve crust crispness, or transfer to an airtight bread bag for up to 4 days. To freeze, slice the completely cooled loaf, place parchment paper between slices, and freeze in a zip-top bag for up to 3 months. Toast frozen slices directly from the freezer.
Nutritional Information
The nutritional values below are estimates calculated per slice, assuming the loaf is divided into 12 equal servings using standard unbleached all-purpose flour and a light butter glaze.
| Nutrient | Amount per Slice | % Daily Value* |
| Calories | 162 kcal | 8% |
| Total Fat | 1.4 g | 2% |
| Saturated Fat | 0.7 g | 4% |
| Trans Fat | 0 g | — |
| Cholesterol | 3 mg | 1% |
| Sodium | 389 mg | 17% |
| Total Carbohydrates | 32.1 g | 12% |
| Dietary Fiber | 1.2 g | 4% |
| Total Sugars | 0.1 g | — |
| Protein | 4.6 g | 9% |
